Microsoft Entra ID (Previously Azure Active Directory) User Provisioning with SCIM
Provision users automatically from Microsoft Entra ID (Previously Azure Active Directory) to quickly build your catalog and keep your users up to date.
The integration between Microsoft Entra ID (Azure Active Directory) and OpsLevel that enables this provisioning to occur is built around an industry-standard protocol known as SCIM (System for Cross-domain Identity Management). To learn more about how Microsoft Entra ID works with SCIM, please see the Microsoft Entra ID User Provisioning guide.
The remainder of this guide is focused on enabling you to configure both OpsLevel and Entra ID to get user provisioning up and running for your organization.
If you are interested in how to set up Single Sign-On in OpsLevel via Microsoft Entra ID, please check out our guide here.
Capabilities supported
The following provisioning features are supported by OpsLevel today:
- Synchronize users from Entra ID to OpsLevel
- Deactivate users in OpsLevel when they do not require access anymore
- Synchronize Entra ID groups as teams in OpsLevel
- Single sign-on to OpsLevel (recommended)
Requirements
To configure SSO, you need:
- A Microsoft Entra ID tenant.
- A user account in Microsoft Entra ID with permission to configure provisioning (for example, Application Administrator, Cloud Application administrator, Application Owner, or Global Administrator).
- An OpsLevel account -- SCIM-based user provisioning is available to all customers of OpsLevel at this time.
- A user account in OpsLevel with an Admin role.
Step-by-step configuration instructions
The OpsLevel - Entra ID Provisioning integration uses the same Application in Entra ID as our Single Sign-On integration. We recommend you configure Single Sign-On first by following the steps here.
Create a SCIM Integration in OpsLevel
In order to complete Step 5, you'll need to be logged in as a user with the Admin role. For more information on roles in OpsLevel, check out the guide.
1. In the OpsLevel app, Click Integrations in the left sidebar.
2. Click the +New Integration tile.
3. On the New Integrations page, click the SCIM tile.
4. Click Create to create a new SCIM Integration.
5. On the SCIM Integration page, press the + Create API Token button and follow the prompts to create your API Token. When created, copy the token for use in Step 6 of Configuring the OpsLevel Microsoft Entra ID Application below.
NOTE: Ensure that you keep the token in a safe place as you will need it when configuring the integration within Microsoft Entra ID and you will not be able to retrieve the value again later. If you do need to retrieve the value you will have to replace the token by clicking Delete API Token and repeat the API Token creation flow.
6. While on this page, copy the SCIM API URL for use in Step 5 of configuring the OpsLevel application in Microsoft Entra ID.
Configure Provisioning in Entra ID
Configuring Microsoft Entra ID to provision users in OpsLevel requires a generic application. If you have already created a generic application for SSO with Entra ID, you can skip to the Assign users and groups section.
Create a new Enterprise Application in the Microsoft Entra Admin Center
To set up the Entra ID SAML application for OpsLevel, first:
1. Sign in to the Microsoft Entra Admin Center portal.
2. In the left sidebar Enterprise Applications and then select All Applications.
3. To add new application, select New application.
4. Select the + Create Own Application Button.
5. Enter any name, OpsLevel will do.
6. Follow the Getting Started steps as directed. For more info on setting up SSO check out our SSO with Microsoft Entra ID guide.
Assign users and groups
1. Add any users and groups that you'd like to provision into OpsLevel.
2. This can just be a single admin user during setup/onboarding, more can be added at anytime.
Configure Provisioning
1. Select the Provisioning tab.
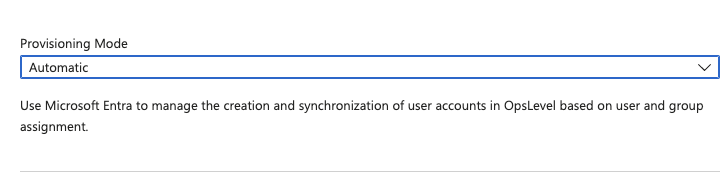
2. Set the Provisioning Mode to Automatic.
3. Under the Admin Credentials section, fill in the API URL and API Token fields that you saved for later in Steps 5 and 6 of the Create a SCIM Integration in OpsLevel section. Then press save
- For Tenant URL, use the SCIM API URL from step 5 above.
- For Secret Token, use the SCIM API Token from step 6 above.
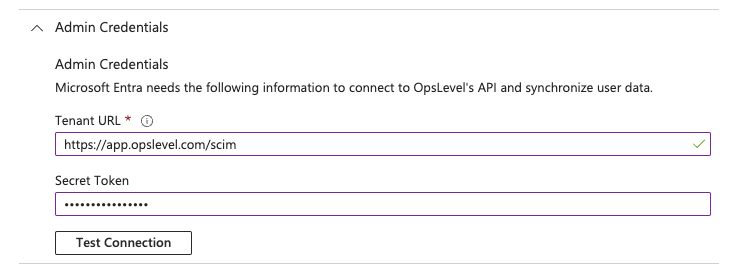
4. In the Entra ID portal, click Test Connection to ensure Entra ID can connect to your OpsLevel account. If the connection fails, ensure your API Token and URL are correct, then try the "Authorize" step again.
5. In the Notification Email field, enter the email address of a person or group who should receive the provisioning error notifications and select the Send an email notification when a failure occurs check box.
6. Select Save.
7. In the Mappings section, review the user and group attributes that will be synchronized from Entra ID to OpsLevel. Note that the attributes selected as Matching properties will be used to match the user accounts in OpsLevel for update operations. Select the Save button to commit any changes.
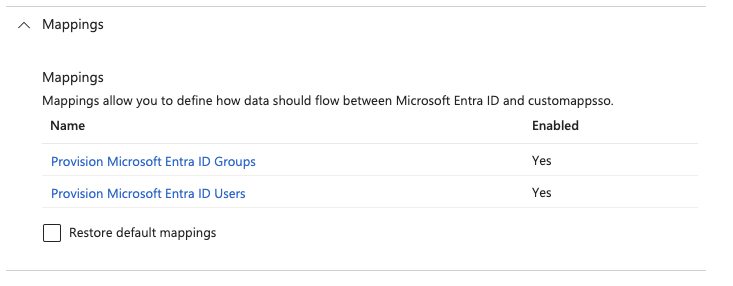
8. Click on Provision Microsoft Entra ID Groups. For Groups, the attribute mapping is straight forward. The default mapping should work out of the box. You can choose to enable/disable provisioning groups, the Source Object Scope, and which actions to be synced. Click Save when finished
9. Click on Provision Microsoft Entra ID Users. For Users, the list of available attributes is large. However, OpsLevel only needs and uses a small subset. Delete all of the unused attributes, and make sure the mappings match the table below:
| customappsso Attribute | Microsoft Entra ID Attribute | Matching precedence |
|---|---|---|
| userName | userPrincipalName | 1 |
| active | accountEnabled | |
| displayName | Join(" ", [givenName], [surname]) | |
| name.givenName | givenName | |
| name.familyName | surname |
Note for the customappsso Attribute userName, an alternative to userPrincipalName may be mail, depending on how your organization is set up. Depending on how your organization manages account enabling/disabling, for the customappsso Attribute active, Switch([IsSoftDeleted], , "False", "True", "True", "False") may be necessary.
10. To enable the Microsoft Entra ID provisioning service for OpsLevel, change the Provisioning Status to On in the Settings section.
11. Define the users you wish to provision to OpsLevel by choosing the desired values in Scope in the Settings section.
12. When you are ready to provision, click Save.
This operation starts the initial synchronization cycle of all users and groups defined in Scope in the Settings section. The initial cycle takes longer to perform than subsequent cycles, which occur approximately every 40 minutes as long as the Entra ID provisioning service is running.
Now that provisioning is configured, you can assign your Entra ID users to the OpsLevel application as needed. New OpsLevel users provisioned this way will be automatically invited to your OpsLevel organization and receive a welcome email with a link to the OpsLevel application. For more information about how to assign Entra ID users, see Microsoft Entra's documentation.
Troubleshooting
Monitoring your deployment from Entra ID
Once you've configured provisioning, use the following resources to monitor your deployment:
1. Use the provisioning logs to determine which users have been provisioned successfully or unsuccessfully.
2. Check the progress bar to see the status of the provisioning cycle and how close it is to completion.
3. If the provisioning configuration seems to be in an unhealthy state, the application will go into quarantine. Learn more about quarantine states here.
Notes
- OpsLevel expects the userName to be in email format and we suggest using the
userPrincipalNameby default, butemailis a good alternative depending on your organization. - At this time, OpsLevel only supports synchronization of the primary email, however we plan to support additional emails in the future.
If you have questions or difficulties with the SCIM integration, reach out to us at [email protected].
Updated 3 months ago