Import Infrastructure Objects via AWS
Import Infrastructure Objects from your AWS account(s)
Infrastructure Catalog allows you to import Infrastructure Objects across your various AWS accounts. Once imported, you can see details about your objects (ARN, source account, region, storage size, etc), filter across AWS accounts ("how many databases do I have cumulatively across all my accounts?"), and define relationships between infrastructure objects to Services, Systems, and other Infrastructure Objects.
Integrating an AWS account with OpsLevel
Setup
To set up this integration you will need to
- Generate an external ID (via the web UI or programmatically)
- Create an IAM policy and IAM role in your AWS account
- Install the integration (via the web UI or programmatically)
Generate an external ID
Generate an external ID via the UI
To generate an external ID, navigate to Add New Integration from Integrations in the side navigation. Once on the New Integration page, find and select AWS. A modal will appear where you can generate and copy a UUID. Keep note of this ID for later.
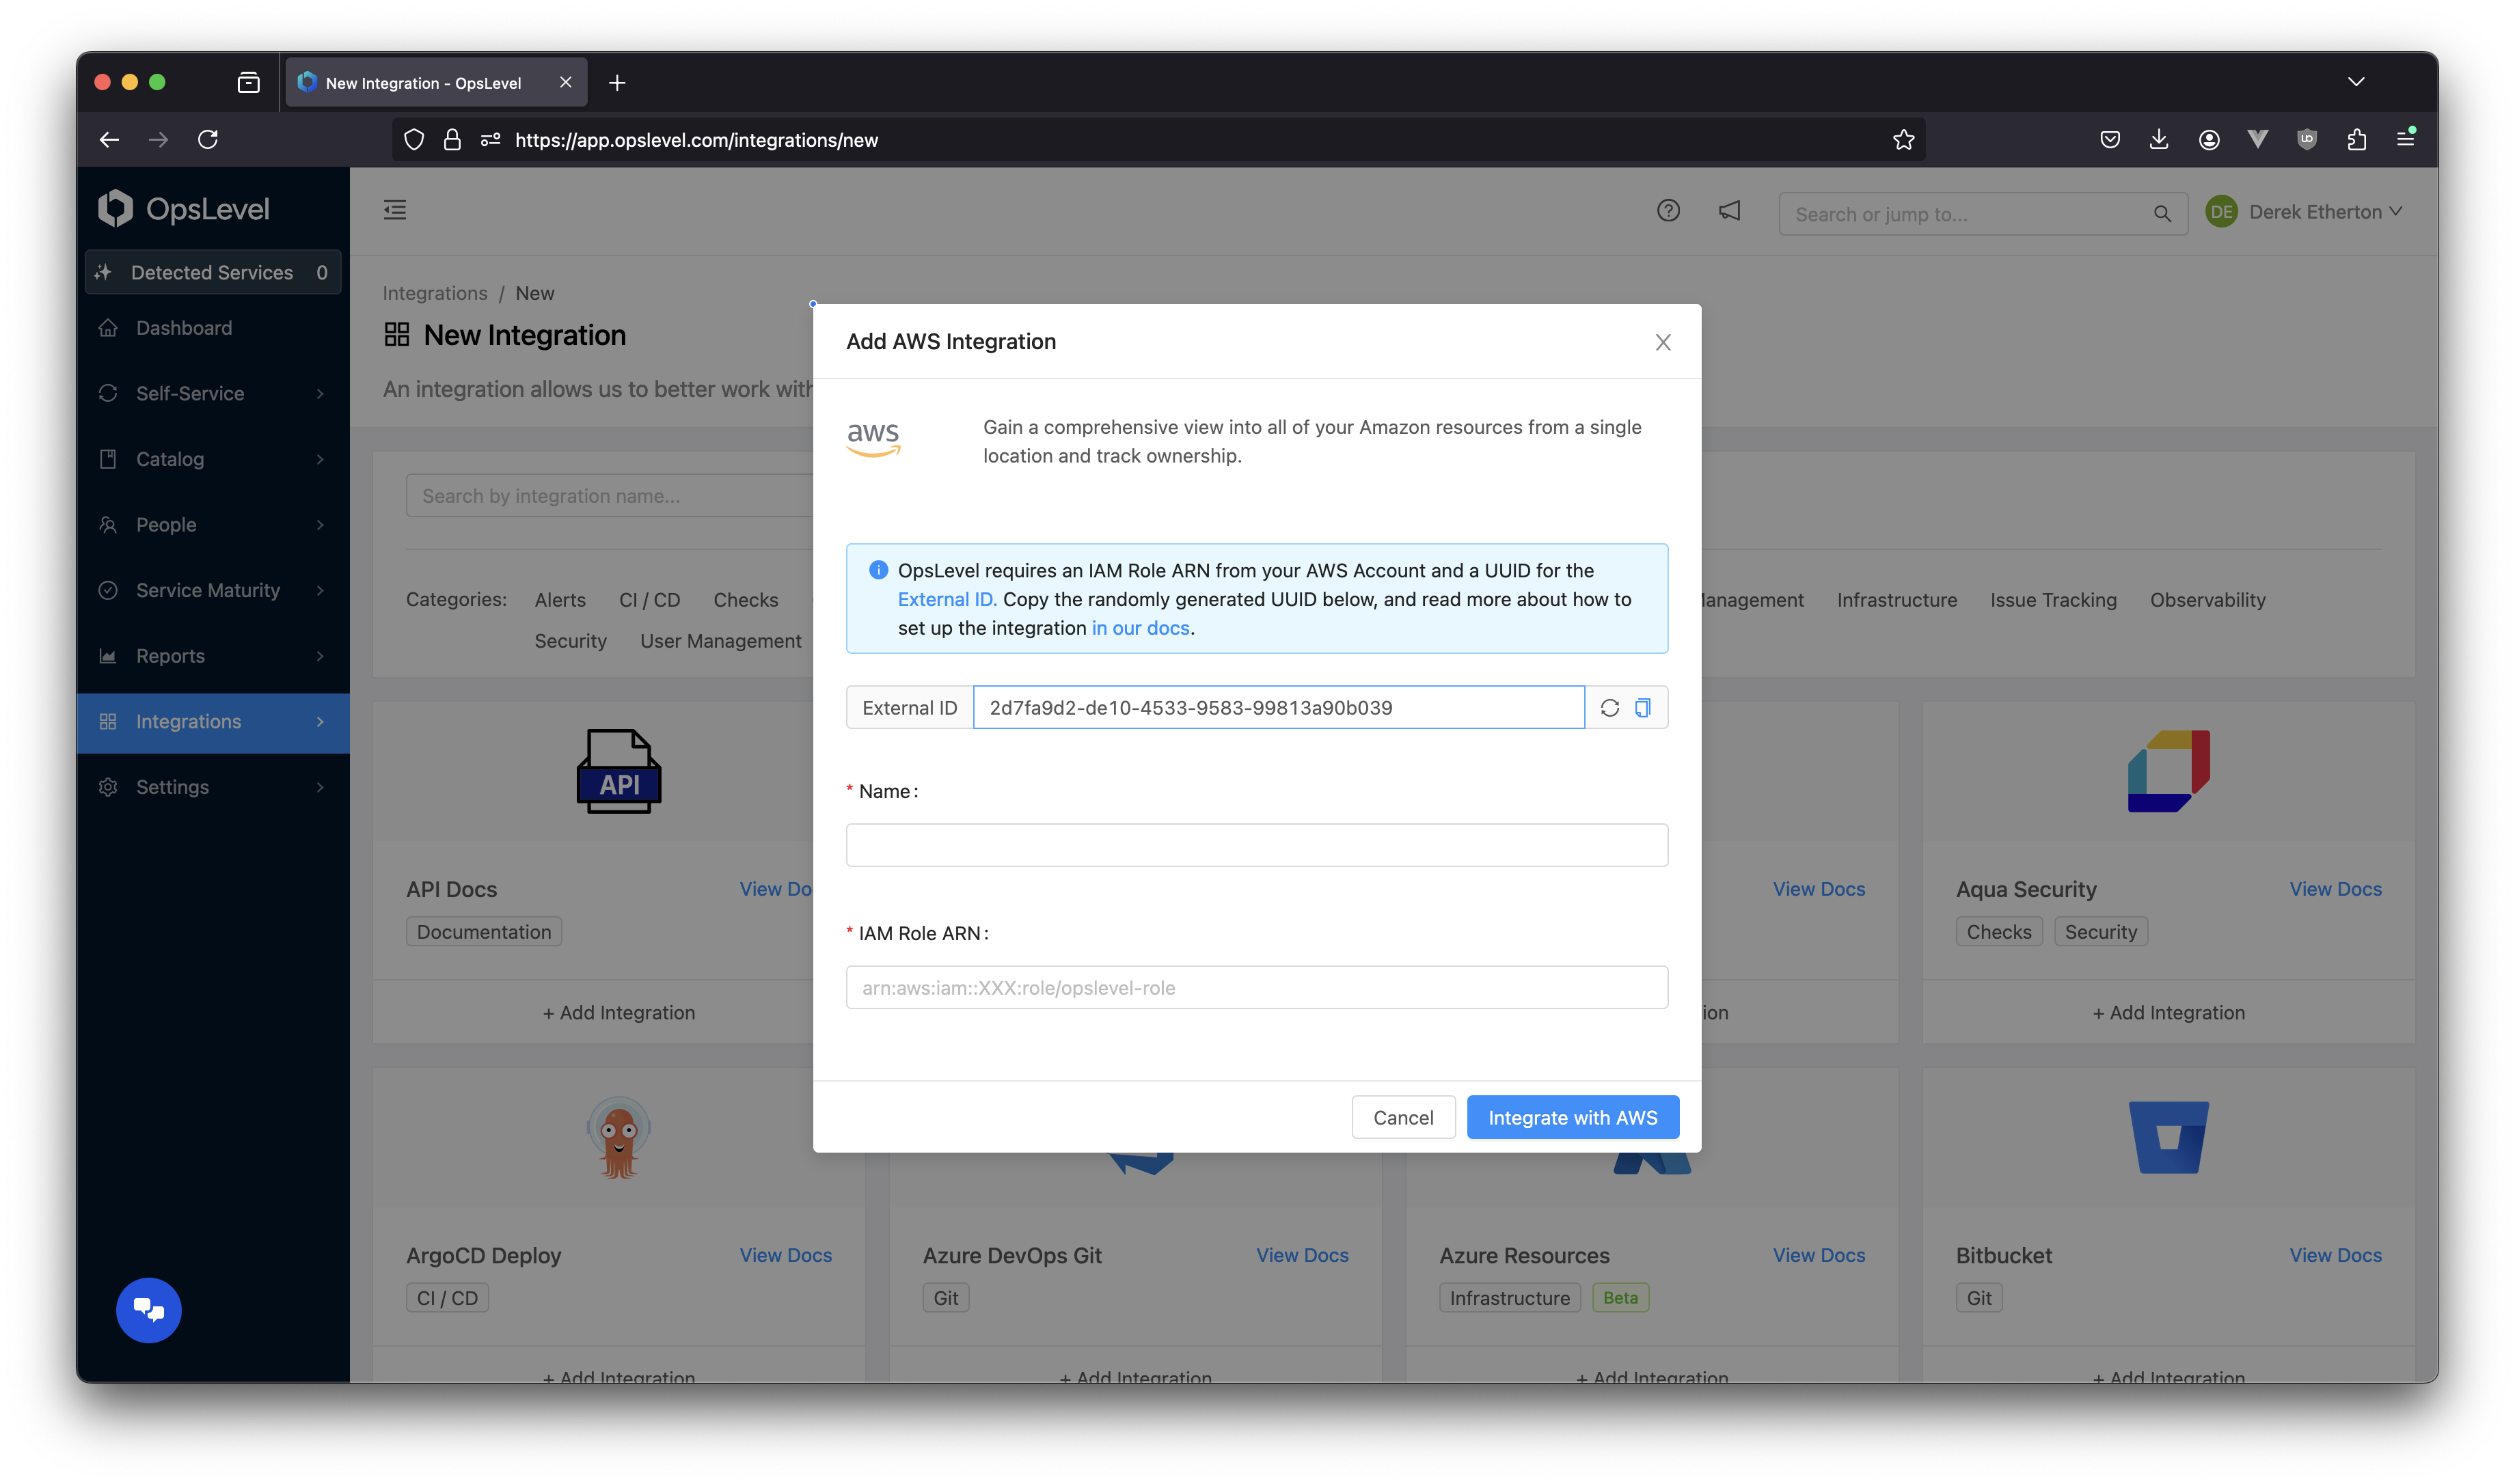
Add AWS Integration modal
Generate an external ID programmatically
You do not need to generate your external ID via the web UI. The GraphQL API for creating the integration and the Terraform method for creating the integration allow you to feed it an external ID instead of using the autogenerated one from the UI. This is especially useful if you need to set up integrations across all of your AWS accounts, or if you would simply like to automate the process.
📘Our Terraform provider recommends this method for generating your external ID: random_string (Resource)
Create AWS objects
Create an AWS IAM policy
To integrate your AWS account with OpsLevel, you must create an IAM policy and IAM role in your AWS account. Once created you must configure the role with an AWS External ID OpsLevel.
After generating the external ID, you'll need to create an IAM policy for the OpsLevel role in your AWS account with the necessary permissions:
- Create a new policy in the AWS IAM Console
- Select the JSON tab. Paste the following permission policies in the textbox:
{
  "Version": "2012-10-17",
  "Statement": [
    {
      "Effect": "Allow",
      "Action": [
        "autoscaling:DescribeAutoScalingGroups",
        "cloudfront:GetDistribution",
        "cloudfront:ListDistributions",
        "cloudfront:ListTagsForResource",
        "dynamodb:DescribeTable",
        "dynamodb:ListTables",
        "dynamodb:ListTagsOfResource",
        "ec2:DescribeInstances",
        "ec2:DescribeRegions",
        "ec2:DescribeVolumes",
        "ec2:DescribeVpcAttribute",
        "ec2:DescribeVpcs",
        "ecs:DescribeClusters",
        "ecs:DescribeContainerInstances",
        "ecs:DescribeServices",
        "ecs:DescribeTasks",
        "ecs:ListClusters",
        "ecs:ListContainerInstances",
        "ecs:ListServices",
        "ecs:ListTasks",
        "eks:DescribeCluster",
        "eks:DescribeFargateProfile",
        "eks:ListClusters",
        "eks:ListFargateProfiles",
        "elasticache:DescribeCacheClusters",
        "elasticache:DescribeReplicationGroups",
        "elasticache:DescribeServerlessCaches",
        "elasticache:ListTagsForResource",
        "elasticloadbalancing:DescribeListeners",
        "elasticloadbalancing:DescribeLoadBalancers",
        "elasticloadbalancing:DescribeTags",
        "elasticloadbalancing:DescribeTargetGroups",
        "elasticloadbalancing:DescribeTargetHealth",
        "kafka:ListClustersV2",
        "kafka:ListTagsForResource",
        "kinesis:DescribeStream",
        "kinesis:ListStreams",
        "kinesis:ListTagsForStream",
        "lambda:ListFunctions",
        "lambda:ListTags",
        "rds:DescribeDBClusters",
        "rds:DescribeDBInstances",
        "rds:DescribePendingMaintenanceActions",
        "s3:GetBucketLocation",
        "s3:GetBucketPolicyStatus",
        "s3:GetBucketTagging",
        "s3:GetBucketVersioning",
        "s3:ListAllMyBuckets",
        "sns:GetTopicAttributes",
        "sns:ListTagsForResource",
        "sns:ListTopics",
        "sqs:GetQueueAttributes",
        "sqs:ListQueueTags",
        "sqs:ListQueues"
      ],
      "Resource": [
        "*"
      ]
    }
  ]
}- Click Next: Tags and Next: Review
- Name the policy
OpsLevelIntegrationPolicyor one of your own choosing. Provide a description. - Click Create policy
Create an AWS IAM role
Create an IAM role for OpsLevel to use the permissions defined in the IAM policy.
- Create a new role in the AWS IAM Console.
- Select AWS account for the trusted entity type, and Another AWS account.
- Enter
746108190720as theAccount ID. This is OpsLevel’s account ID, and grants OpsLevel access to your AWS data. - Select Require external ID and enter the external ID generated in the previous step.
- Click Next.
- If you’ve already created the policy, search for it on this page and select it. Otherwise, click Create Policy, which opens in a new window, and follow the instructions from the previous section.
- Click Next.
- Give the role a name such as
OpsLevelIntegrationRole, as well as an apt description. - Click Create Role.
- Ensure you have setup the following trust relationship below on the role you just created.
Trust Relationship JSON:
{
    "Version": "2012-10-17",
    "Statement": [
        {
            "Effect": "Allow",
            "Principal": {
                "AWS": "arn:aws:iam::746108190720:user/opslevel-integration"
            },
            "Condition": {
                "StringEquals": {
                    "sts:ExternalId": "XXXXXXXXXXXXXX"
                }
            },
            "Action": "sts:AssumeRole"
        }
    ]
}
Self-Hosted NoteIf you are setting this integration up on self-hosted OpsLevel please make sure you change the Principal ARN to target a trust with the AWS user you created for your instance of self-hosted OpsLevel
Installation
Install via UI
You can now return to the "Add Integrations" page where you generated the External ID. Populate a name and your IAM role ARN and submit the form, and your AWS integration will be created. If you chose to use some different UUID in your IAM role setup, the generated one can be replaced by any arbitrary string value.
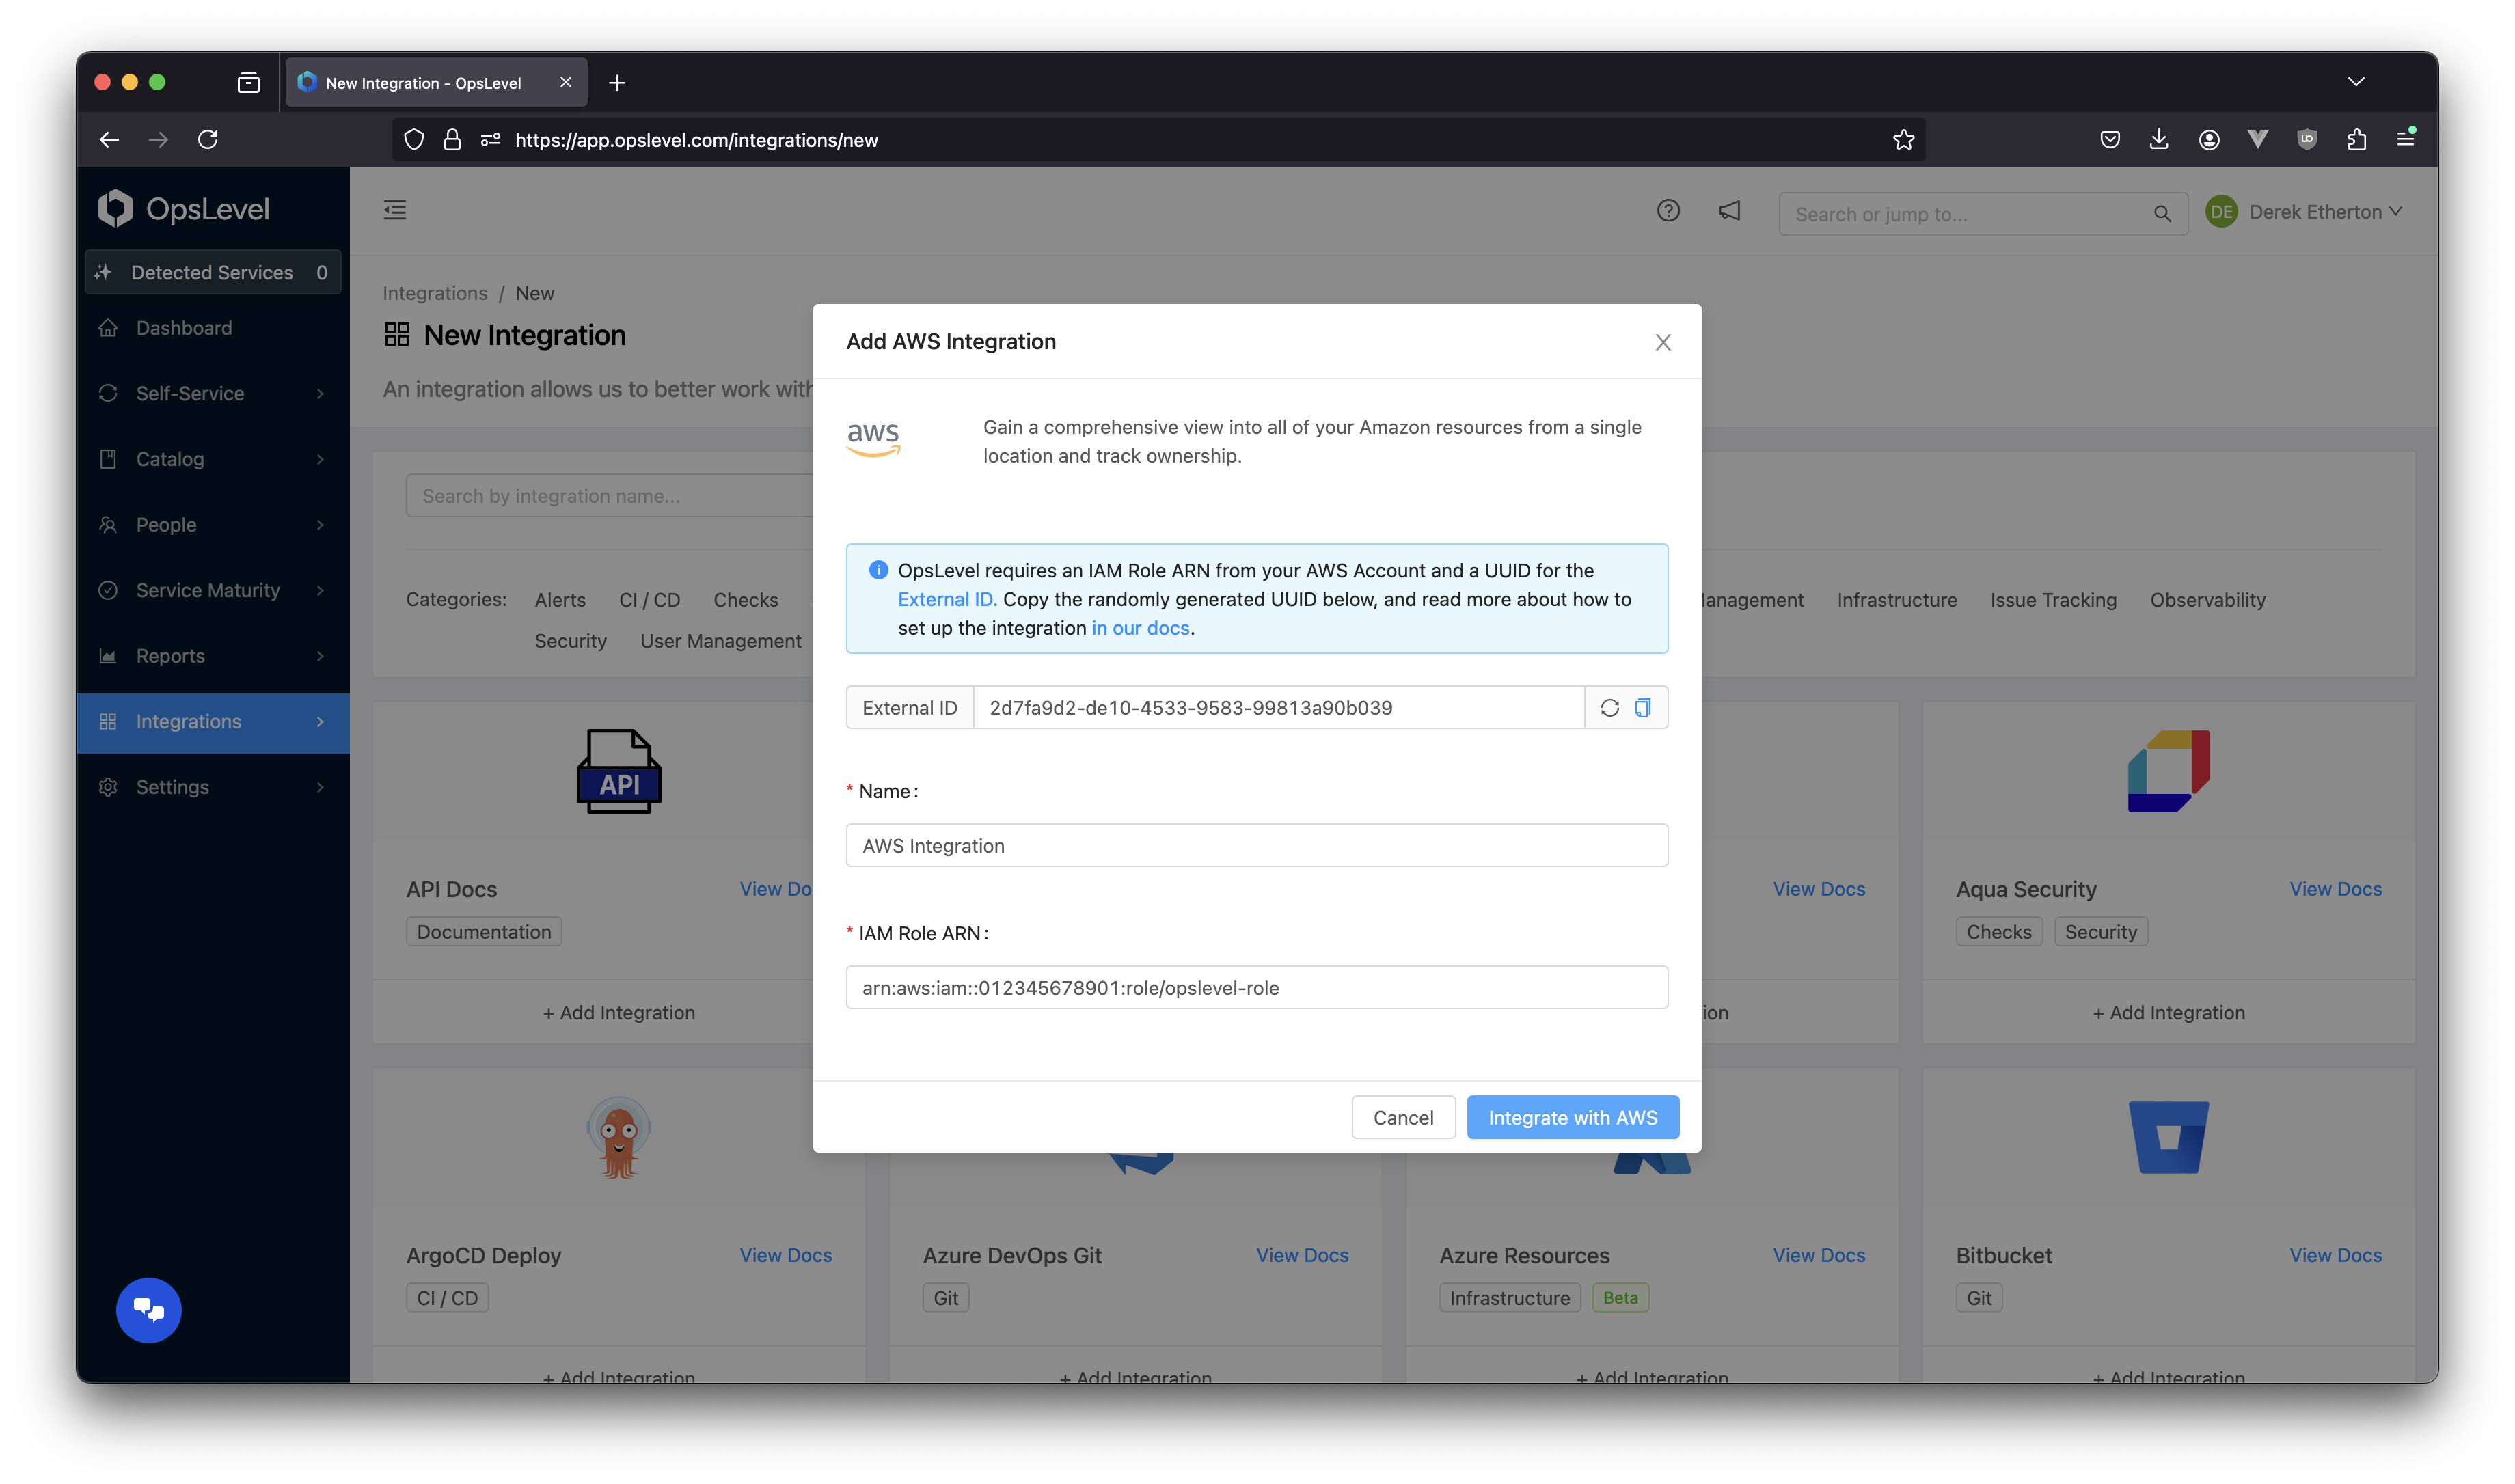
Populated AWS integration modal
Install via GraphQL
Once your IAM Role and Policy are created, create the integration using our GraphQL API. You can click here to go to the GraphiQL client with the mutation sample pre-filled (ensure you are logged in to OpsLevel).
Here's a sample mutation for creating the integration:
mutation awsIntegrationCreate($iamRole: String!, $externalId: String!, $name: String) {
  awsIntegrationCreate(input: {iamRole: $iamRole, externalId: $externalId, name: $name}) {
    integration {
      id
      name
      type
    }
    errors {
      message
      path
    }
  }
}
Query Variables
{
  "iamRole": "IAM role ARN",
  "externalId": "Paste External ID here",
  "name": "Paste nickname for AWS account here"
}
Install via Terraform
If you would like to further automate your installation, or install this integration at scale, we recommend using Terraform.
📘Our Terraform provider has the following documentation for installation: opslevel_integration_aws (Resource)
Verify AWS integration was successful
Once you have integrated your AWS account(s) you should now be able see them by navigating to Installed Integrations via Integrations on the side navigation. Once you've clicked on your integration you will be able to see details about your integration such as the Account ID and when it was last synced.
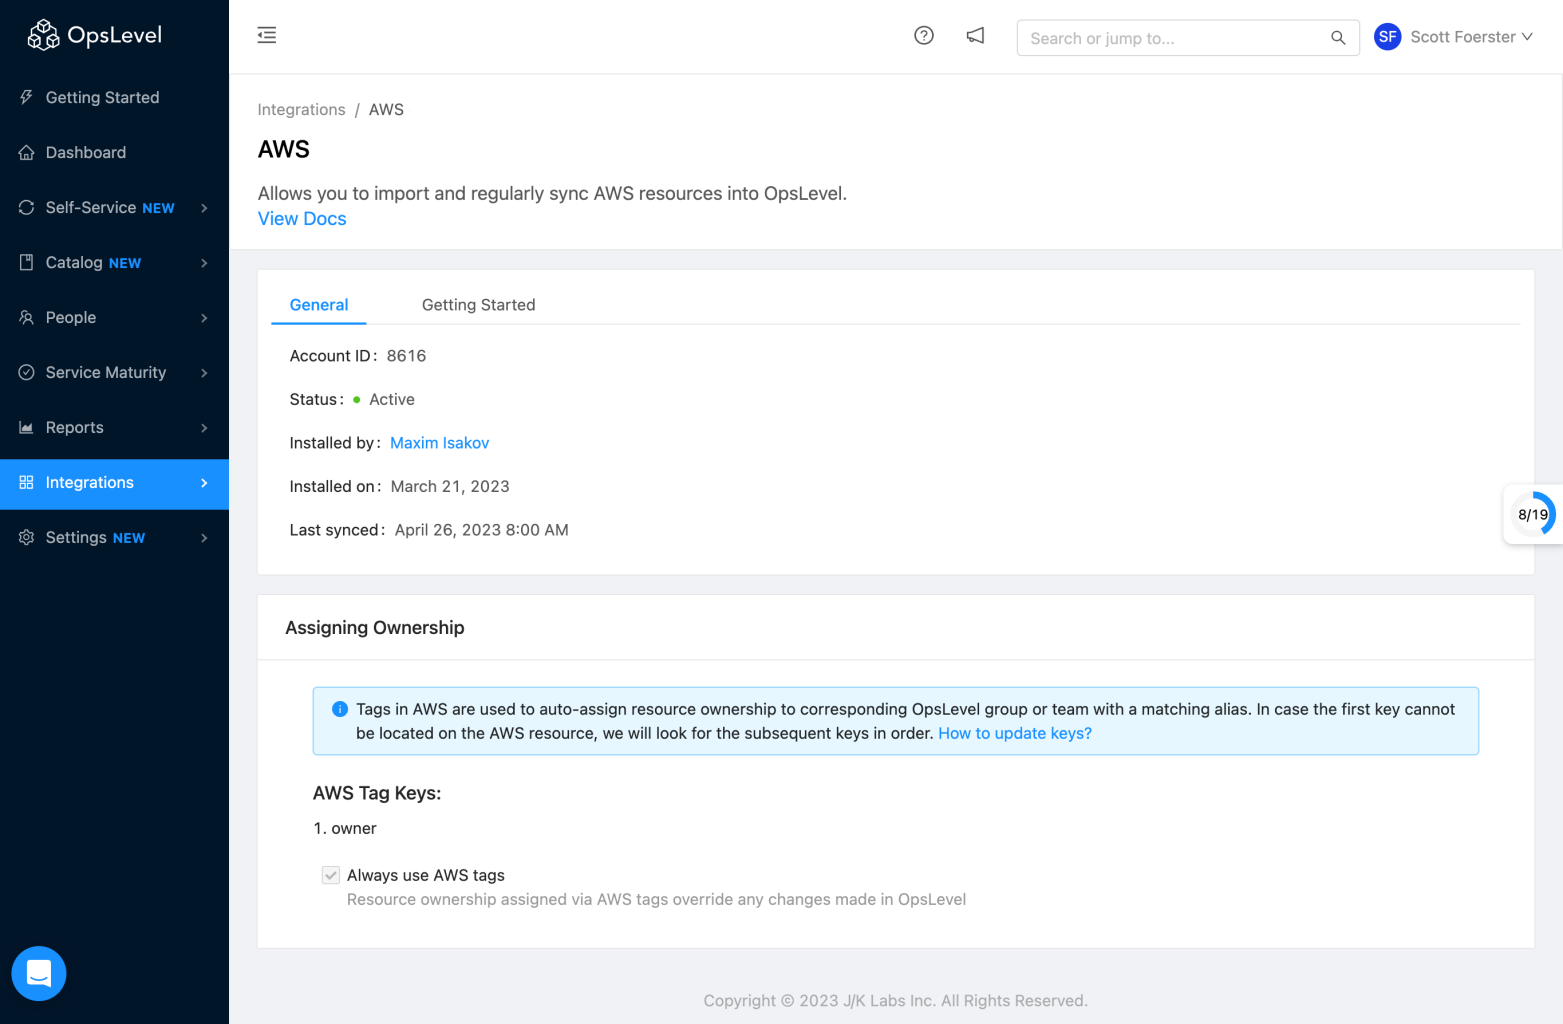
AWS Integration page
Inferring ownership/relationships via AWS tags
Many AWS customers utilize tags within the admin console to assign ownership or relationships to Infrastructure Objects. Our AWS Integration allows you to leverage these existing tags to make ownership or relationship assignment for Infrastructure Objects simple.
Note that certain characters (:, @, =, and +) in tags will be converted to underscores - so, for instance, the key infra:dependency will be converted to infra_dependency.
Ownership Tags
By default, when a new integration is created we set a default ownership defining tag key of owner. If the value of owner matches a Team or Group alias we will automatically assign ownership of that Infrastructure Object to that Team or Group. Ownership for these objects will be locked from the UI or API.
You can use GraphQL to update the array of tag keys. You can also use GraphQL to control whether tags should override ownership set in OpsLevel directly using the awsTagsOverrideOwnership field. You can click here to go to the GraphiQL client with the query and mutation samples pre-filled.
Sample query to list out all AWS integrations in the account with id for reference in the mutation below:
query aws_integrations {
  account {
    integrations(type: "aws") {
      nodes {
        ... on AwsIntegration {
          name
          id
          externalId
          createdAt
          ownershipTagKeys
        }
      }
    }
  }
}
Sample mutation updating the tags used for ownership inference on an AWS integration:
mutation awsIntegrationUpdate_override_tags {
  awsIntegrationUpdate(
    integration: {id: "XXX"}
    input: {ownershipTagKeys: ["owner", "team"], awsTagsOverrideOwnership: true}
  ) {
    integration {
      id
      ... on AwsIntegration {
        iamRole
        externalId
        aliases
        ownershipTagKeys
        awsTagsOverrideOwnership
      }
    }
    errors {
      message
      path
    }
  }
}
Relationship Tags
By default OpsLevel sets default relationship-defining tag keys for belongs_to (opslevel-belongs-to), dependency_of (opslevel-dependency-of) and depends_on (opslevel-depends-on) relationships. These tags can be used inside of your AWS account to manage relationships using tags.
You can use GraphQL or the Account Settings UI to update the array of tag keys used for each of these relationships. Modifying these tag keys/prefixes allows for the use of existing tagging schemes to infer different relationship types.
Sample mutation for updating the tags used for relationship inference on an AWS integration:
mutation assignUpdatedTagRelationships {
  tagRelationshipKeysAssign(input: {
    dependsOn: ["opslevel-depends-on", "depends-on"],
    dependencyOf: ["opslevel-dependency-of", "dependency-of"],
    belongsTo: "part-of"
  }) {
  	errors { message path }
    tagRelationshipKeys {
      belongsTo
      dependencyOf
      dependsOn
    }
  }
}
Account Settings screen in the UI for updating the tags used for relationship inference on an AWS integration:
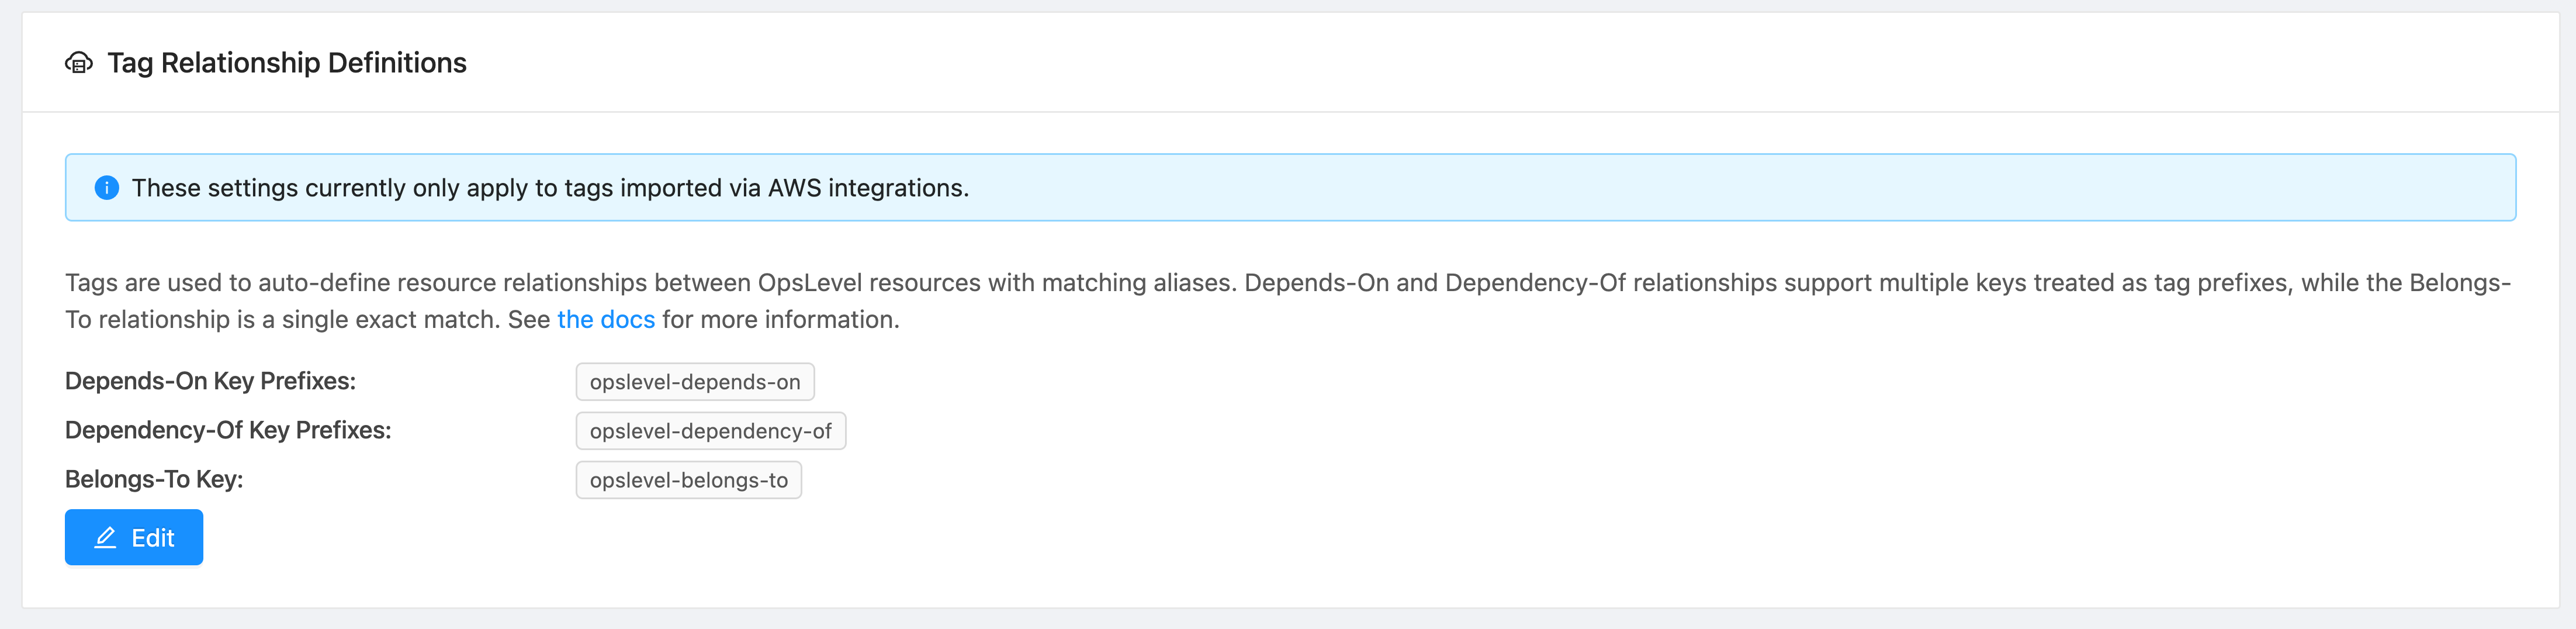
View your current list of relationship tag keys/prefixes
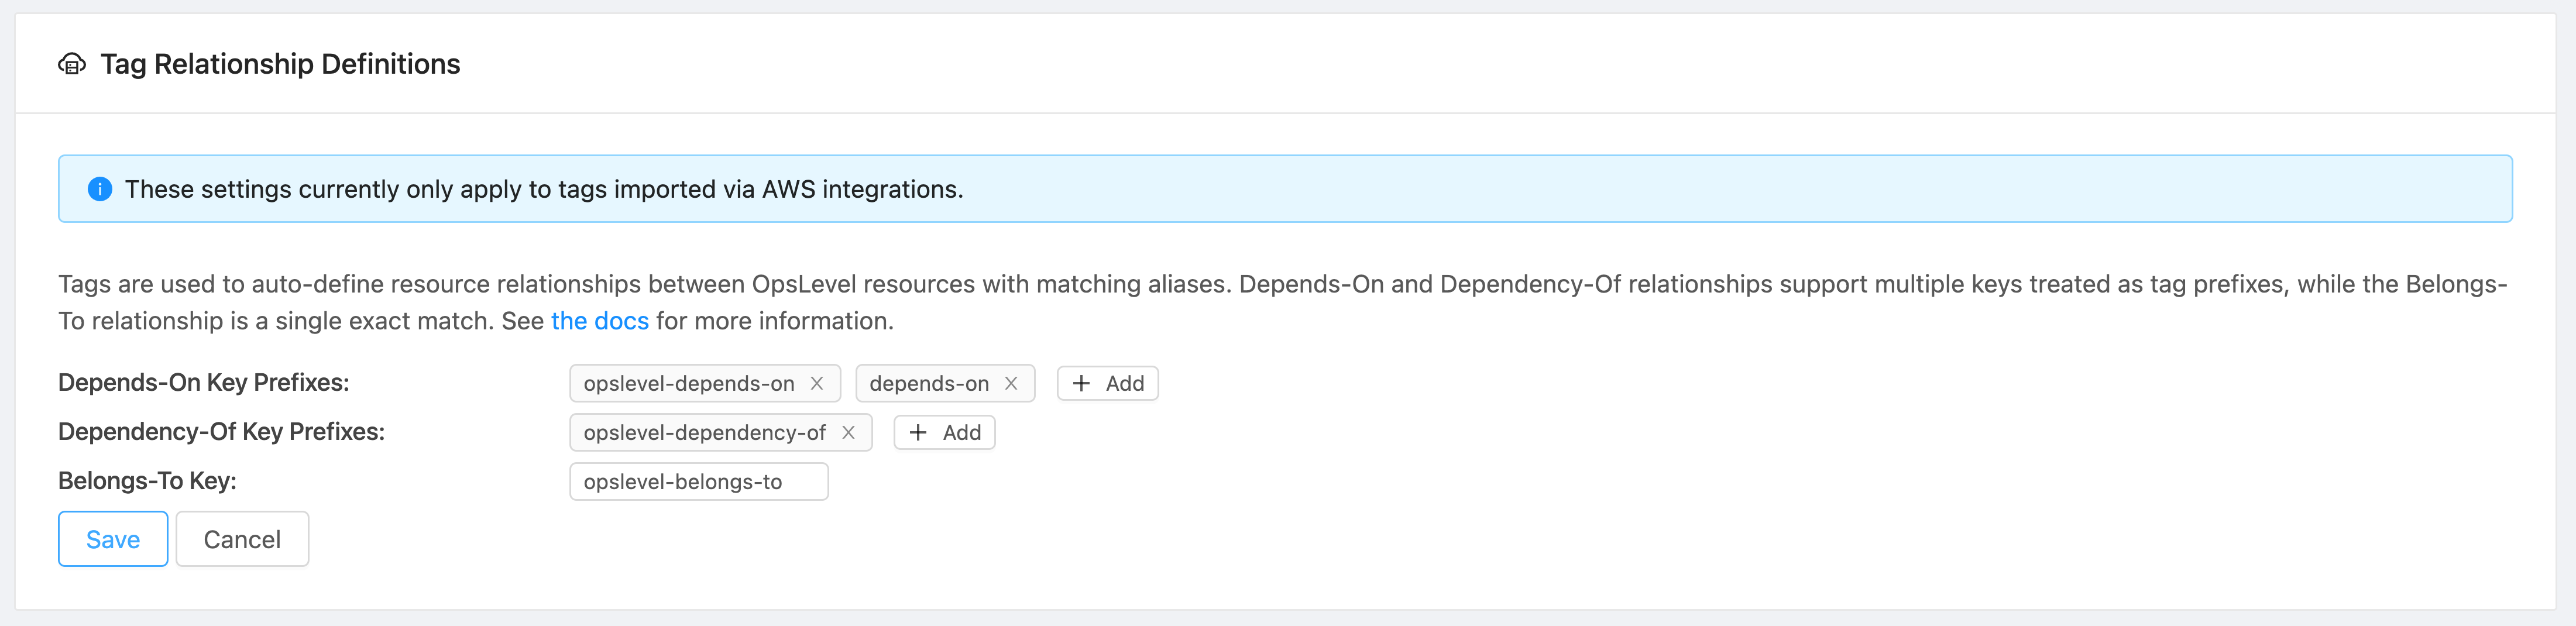
Edit mode for modifying the tag keys/prefixes
What Infrastructure objects and types are imported?
We support a wide range of commonly used AWS Infrastructure Objects and Types as part of our integration, namely:
- Cache
- ElastiCache (cluster)
- Compute
- EC2 (instance)
- Container
- ECS Cluster (EC2 clustering)
- ECS Service
- ECS Task
- EKS Cluster
- EKS Node Group
- EKS Fargate Profile
- Database
- DynamoDB (instance)
- RDS (instance, cluster, replica)
- Networking
- VPC
- Queues / Message Brokers
- SNS (topics)
- SQS (queues)
- MSK Cluster
- Serverless
- Lambda
- Kinesis Data Stream
- Storage
- S3
If there is an Object or Type not listed that you would be interested in importing, please reach out to our customer support team.
We synchronize changes from AWS every 12 hours.
Security NoteOpsLevel uses AWS APIs to sync infrastructure objects, including Lambdas. AWS Lambda APIs return all environment variables, so avoid storing sensitive information (e.g., database credentials, API keys, tokens) there, or they will be transmitted to OpsLevel. AWS recommends using Secrets Manager instead.
Accessing Infrastructure objects
Checks on Infrastructure is currently in Beta. If you wish to gain access to Checks/Maturity on Infrastructure, contact your support representative directly or email us at [email protected]. As part of enabling this feature, Infrastructure objects in OpsLevel have moved to Components. You can now manage your Infrastructure Components similarly to other components in OpsLevel. Visit out Components documentation for more information on getting started.
If you are not yet a customer, request a demo at https://www.opslevel.com/request-a-demo.
You can access your imported infrastructure objects by selecting Infrastructure in Catalog from the side navigation.
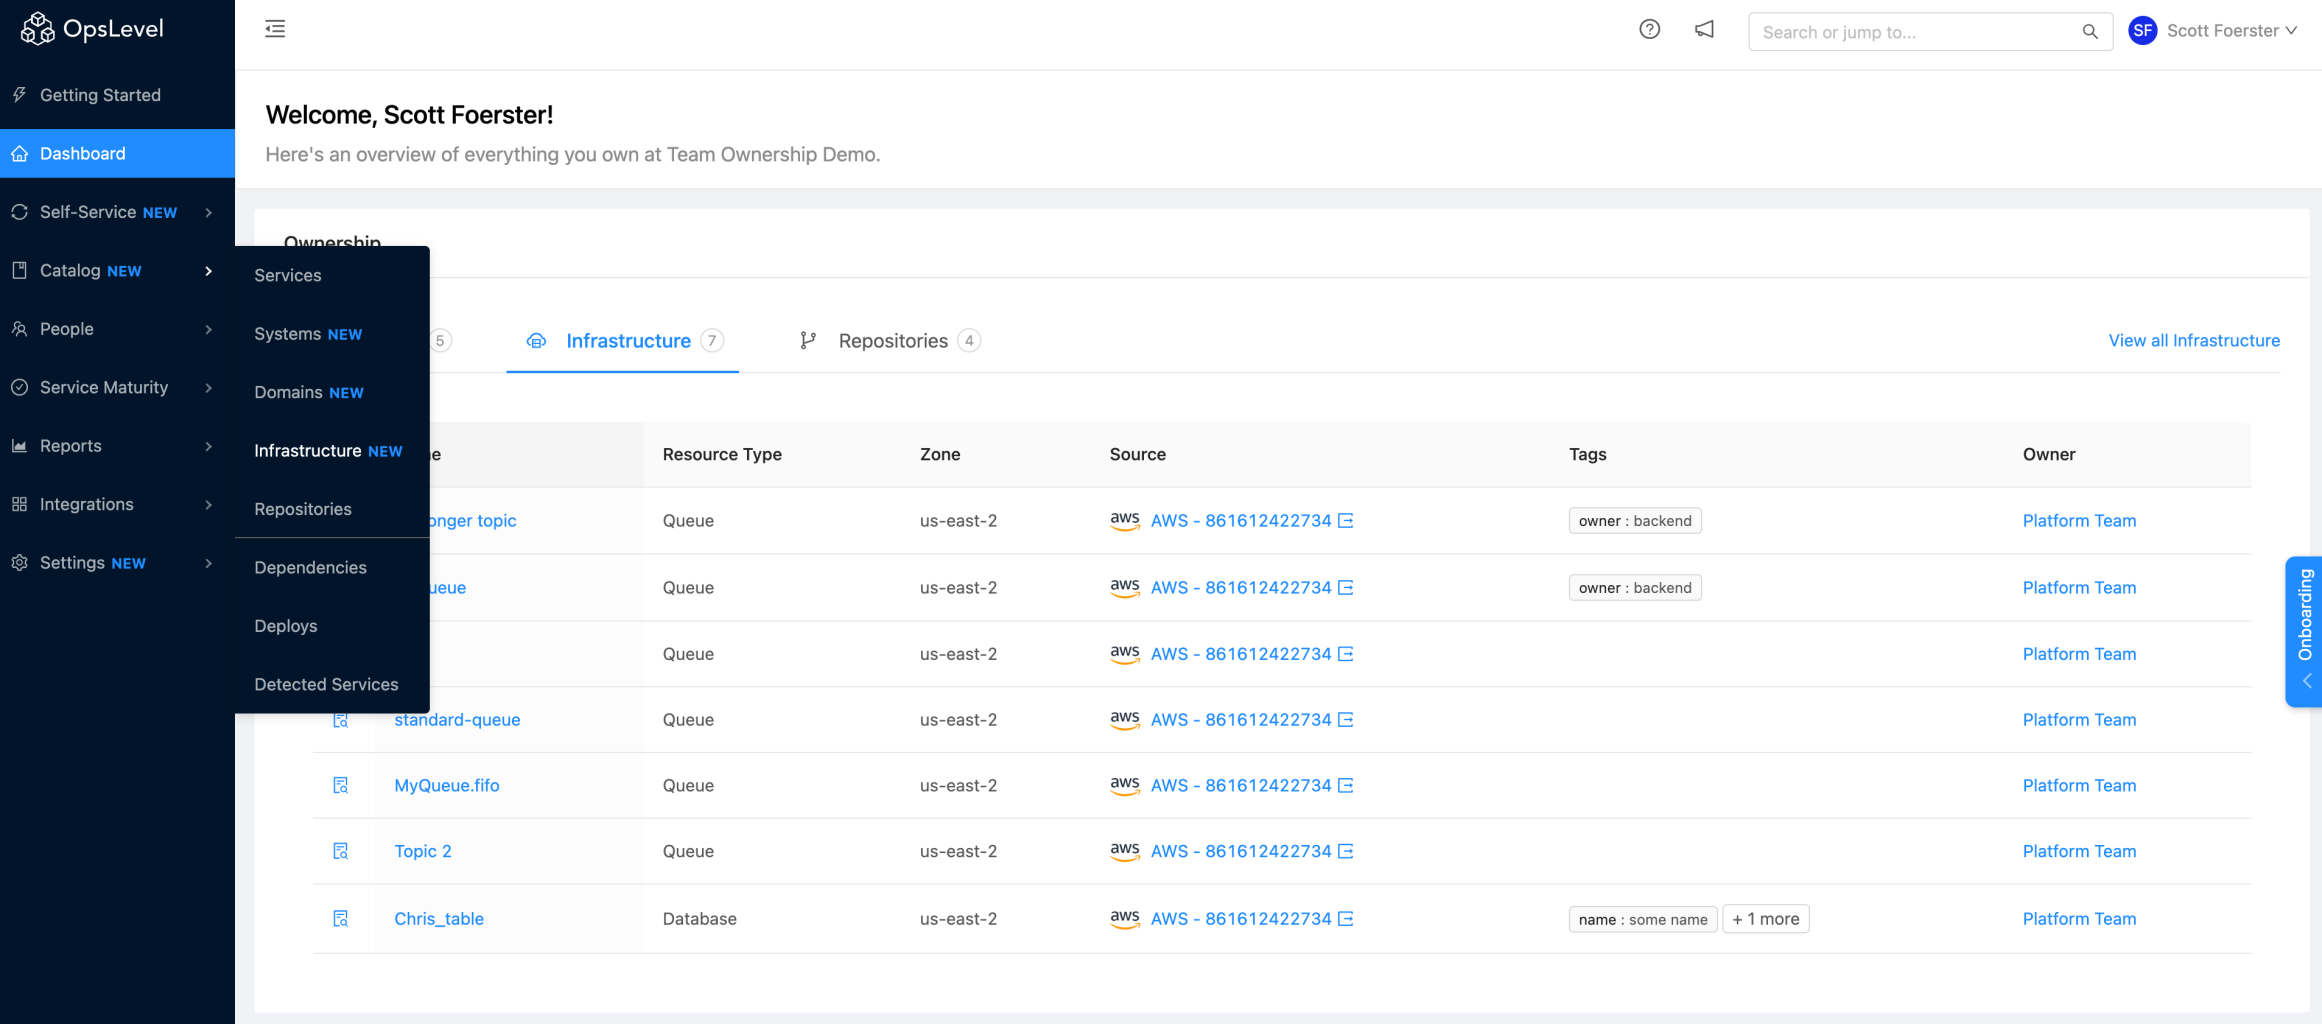
Infrastructure menu item
Once in the Infrastructure list page you will see a table listing all of the infrastructure objects you have imported. At a glance you will be able to see the following data around your objects:
- Name
- Resource Type
- Zone
- Source
- Tags
- Owner
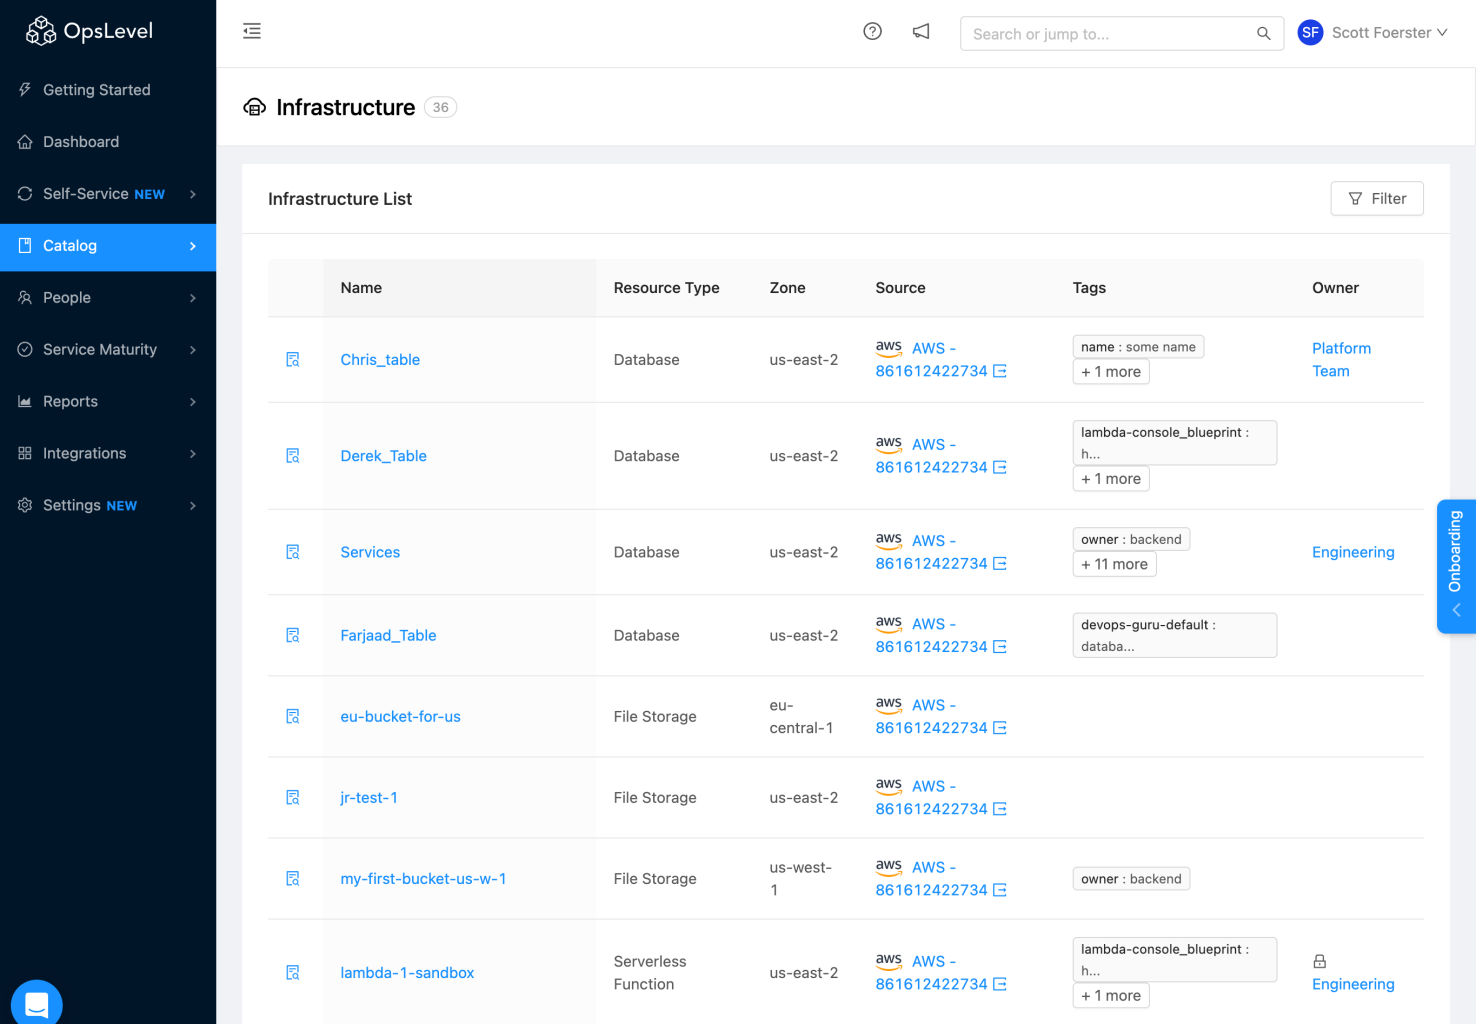
Infrastructure table
You can discover even more information about your Infrastructure Objects by clicking the View Details icon in the table. This will open a drawer component that will display when the object was last synced along with a host of attributes we've pulled in from AWS around that object.
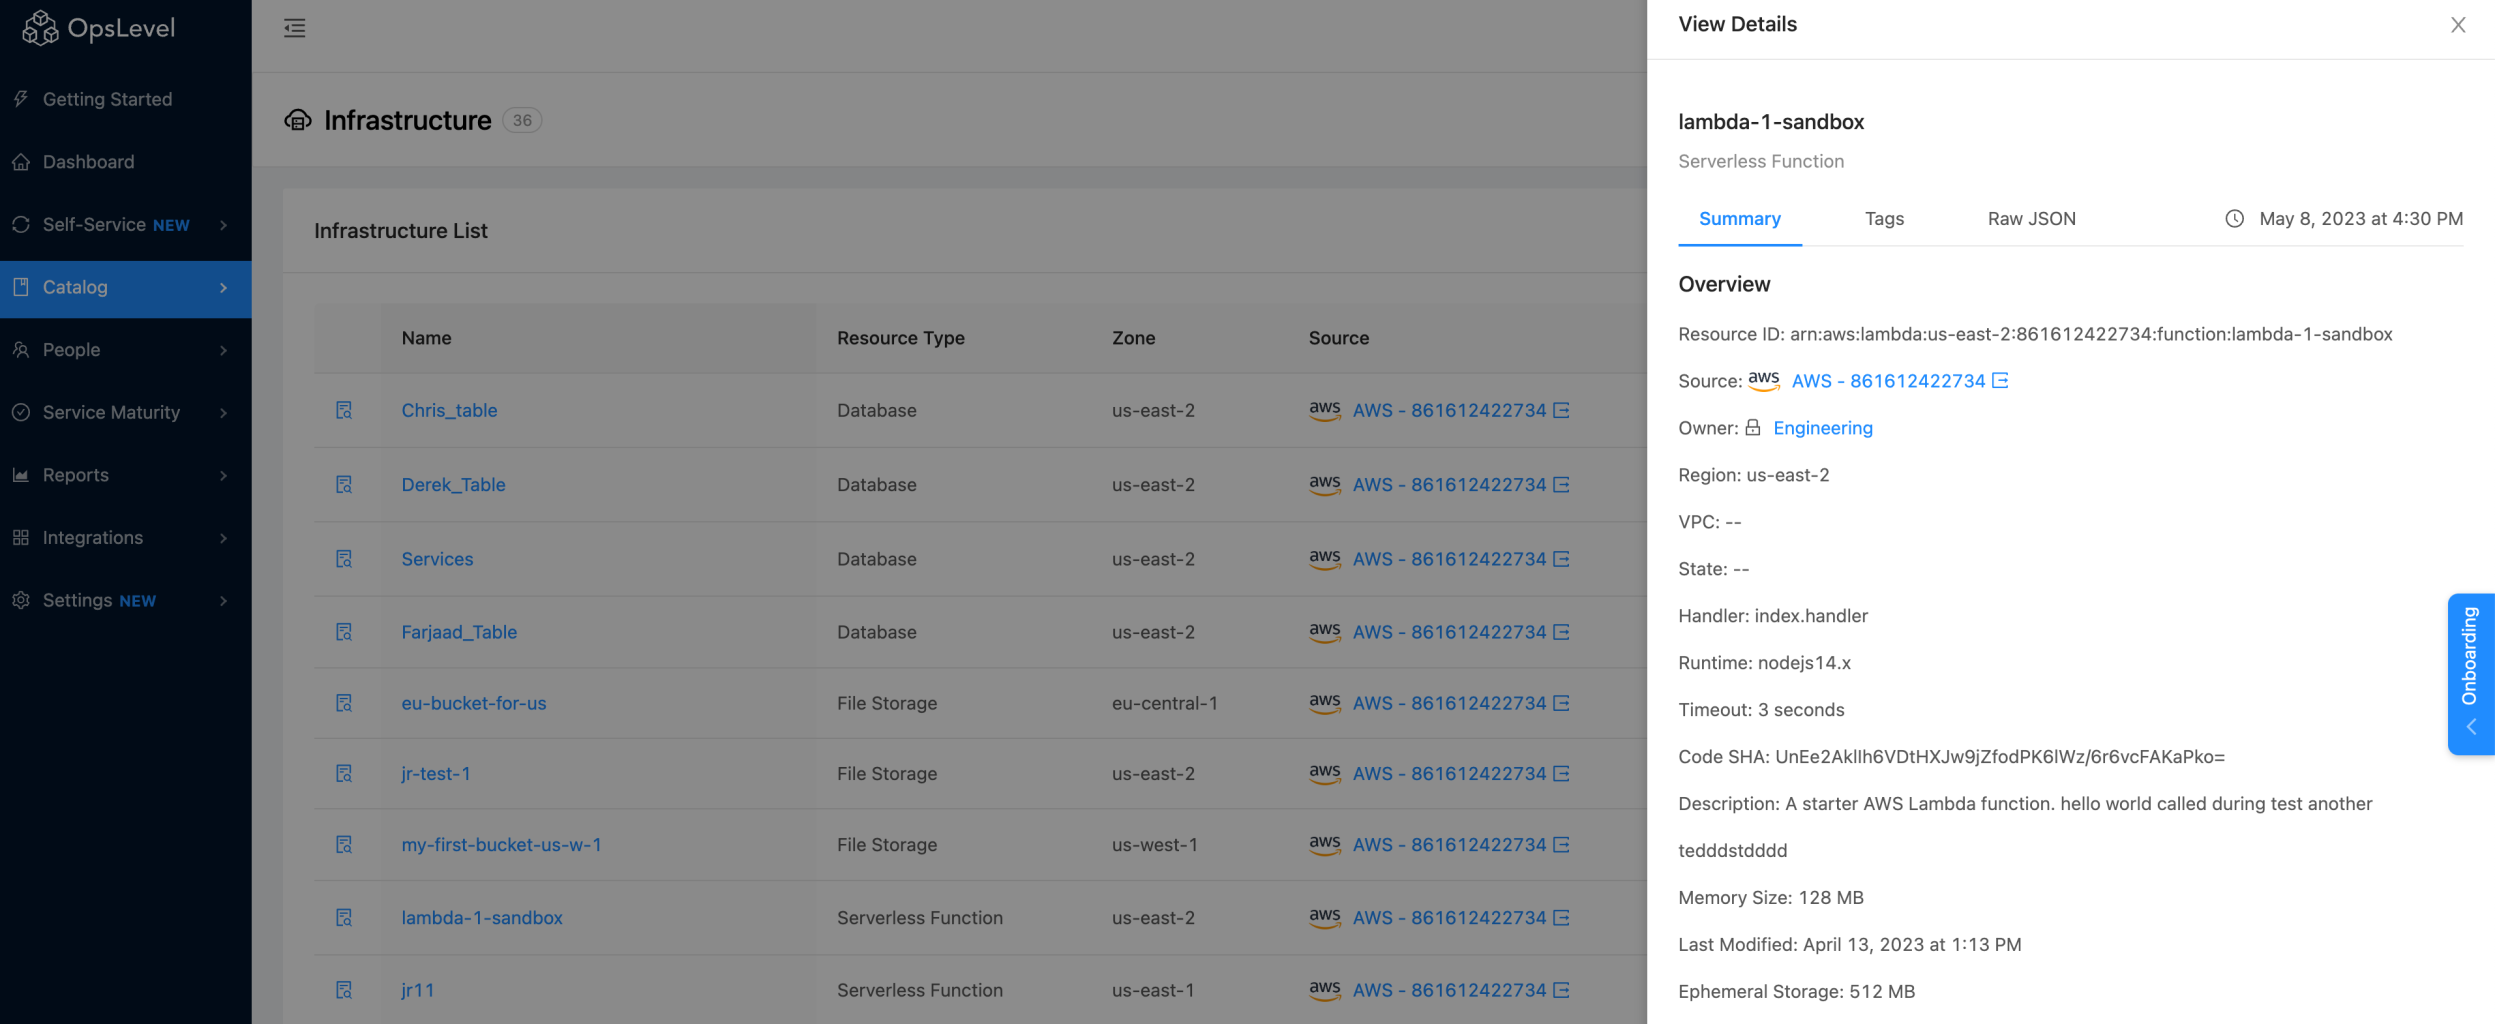
"View Details" drawer
For a full breakdown of what we've synced from your AWS account, you can select the Raw JSON tab.
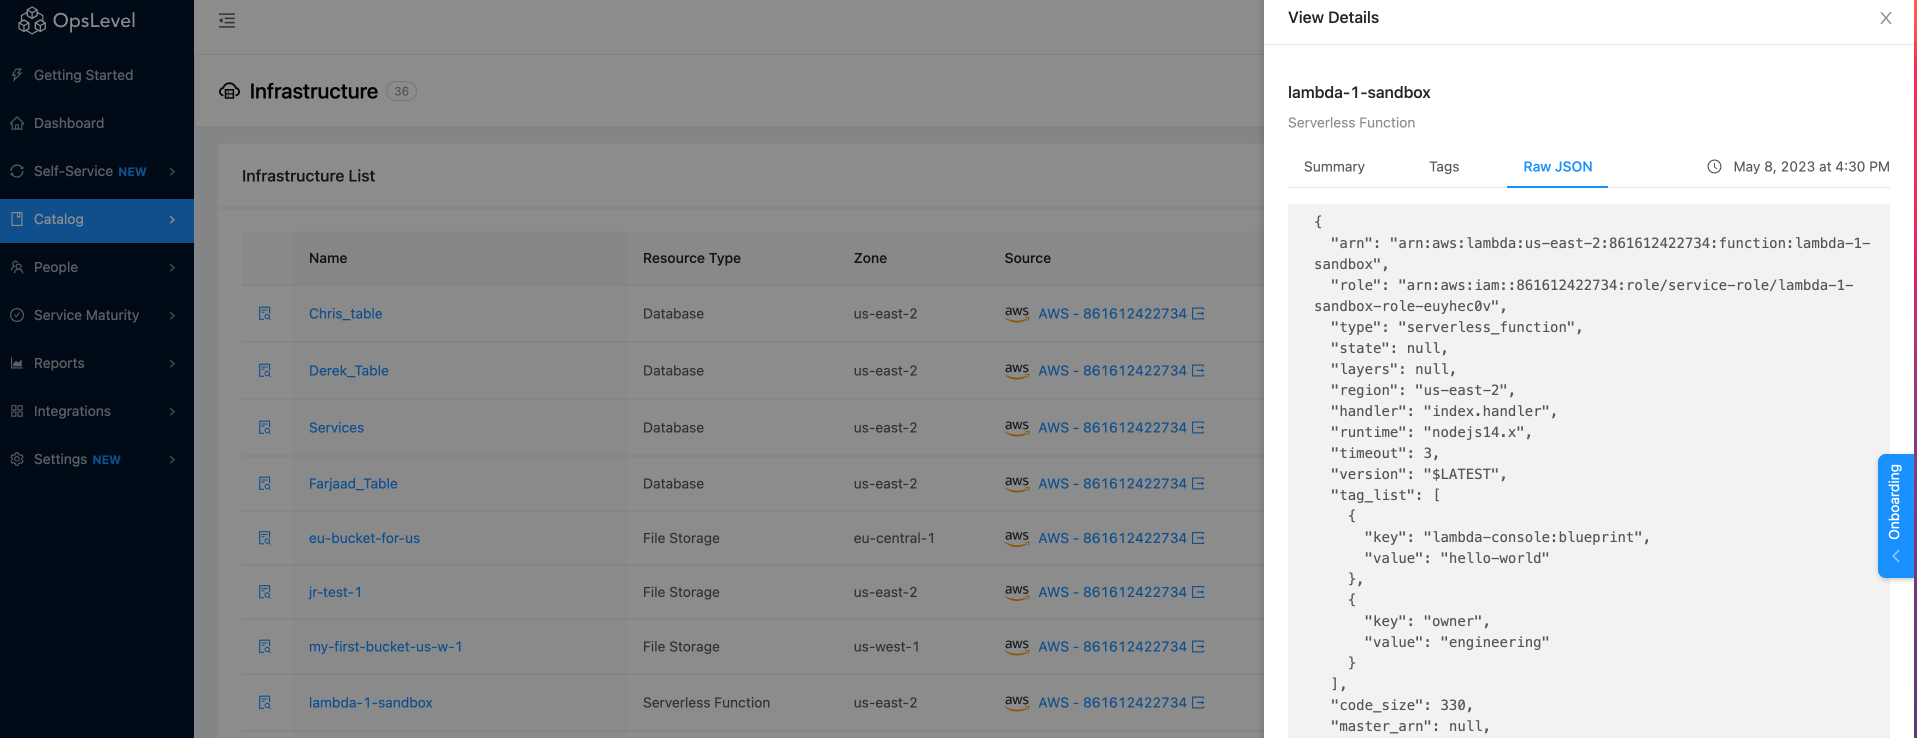
Raw JSON tab
Selecting the name of the object from the list will open a new details page for this object. The Infrastructure Details page contains all of the information displayed in the View Details drawer with the added bonus that you can also see which Services and other Infrastructure your infrastructure object relates to. See "Adding Relationships to Infrastructure Objects" further down in the docs.
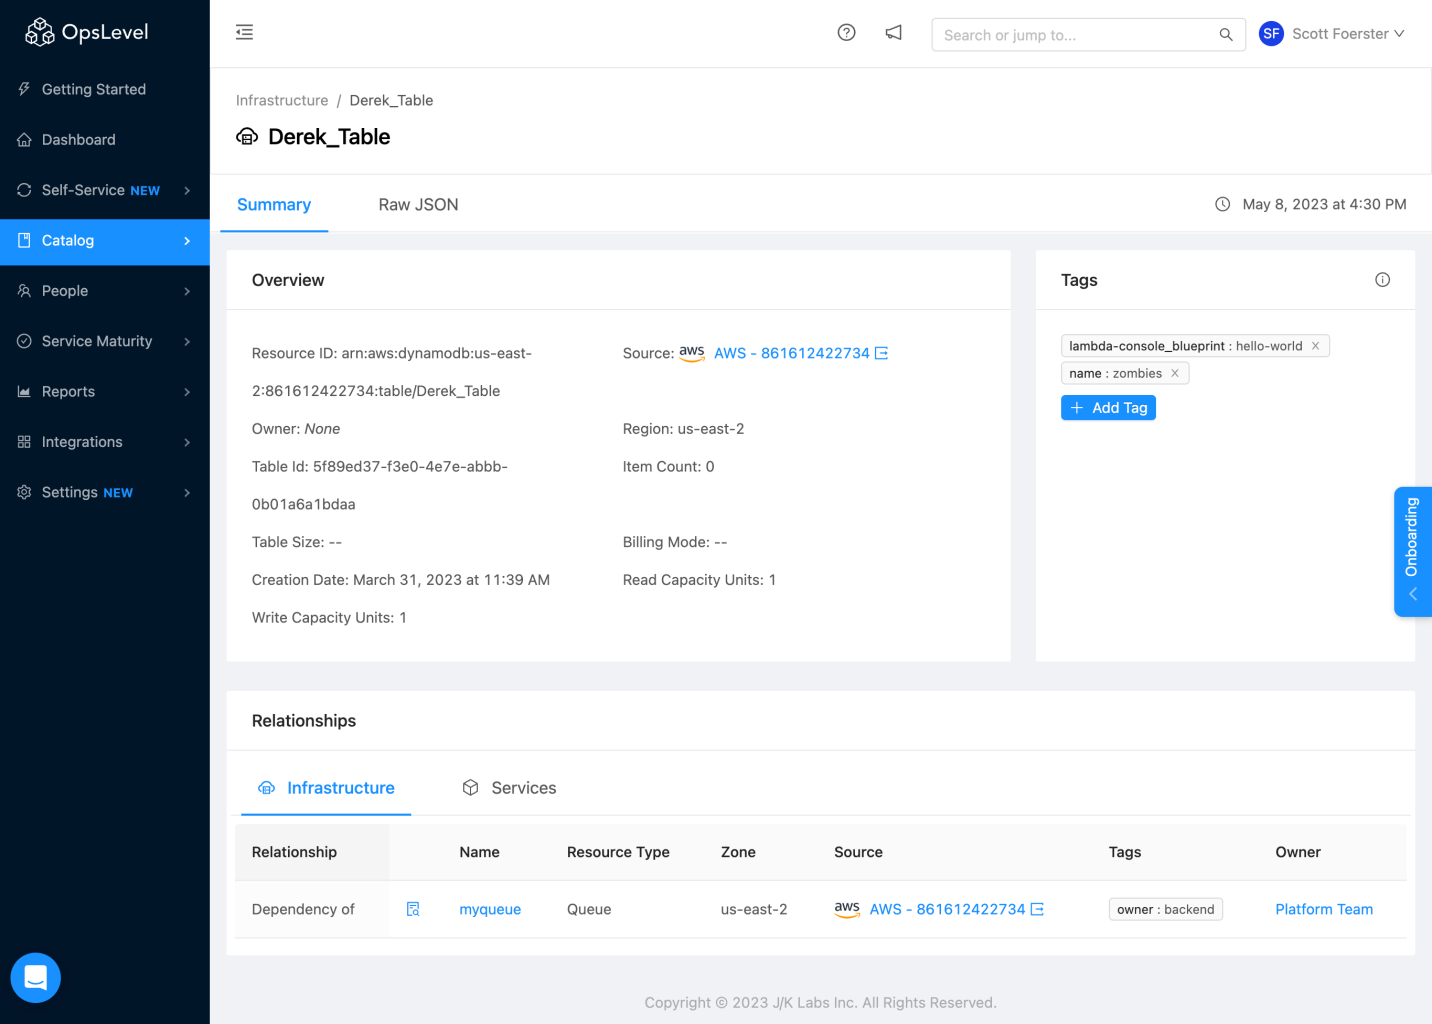
Infrastructure Details page
Filtering on Infrastructure objects
Similar to Services, you can apply filters against your list of Infrastructure Objects. Click the Filter icon from the Infrastructure List page to open filters. Filters work the same for Infrastructure as they do elsewhere in OpsLevel with the added bonus that you can filter on the attributes of your infrastructure objects. As such, you can filter for queries like "which of my databases have multi-zone availability enabled?".
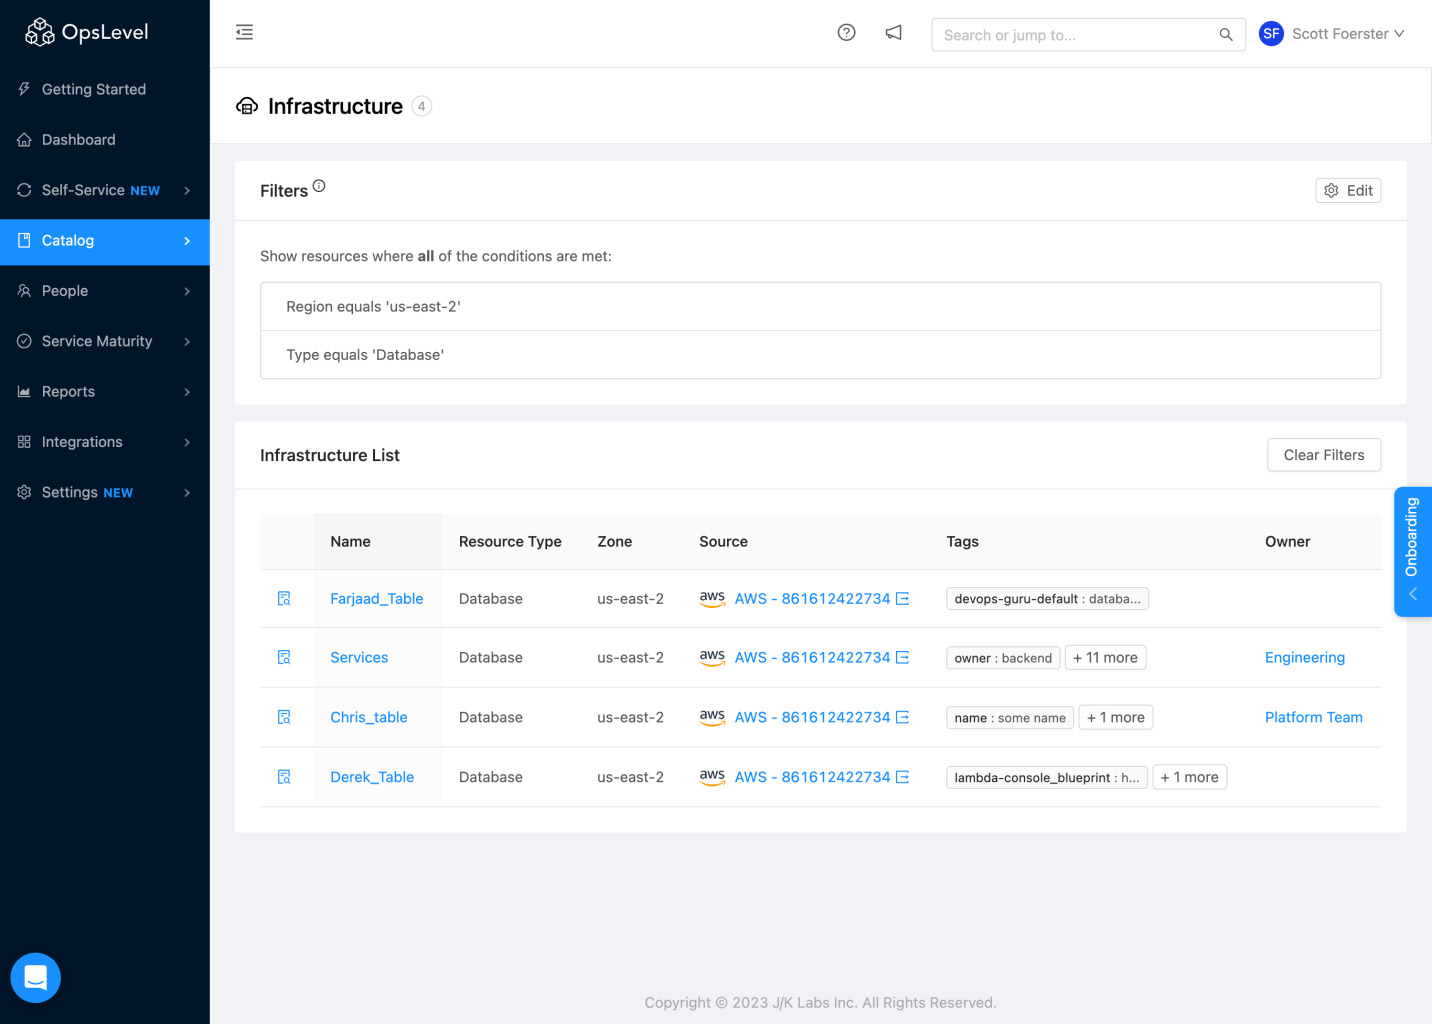
Filtering Infrastructure table
Adding relationships to Infrastructure objects
Utilizing both GraphQL and AWS tags, you can add relationships to your Infrastructure Objects in three ways:
- "depends on"
- Infrastructure Objects can "depend on" Services or other Infrastructure Objects. A "depends on" relationship implies that the Infrastructure Object relies on the given Service or other Infrastructure Object to operate.
- "dependency of"
- Infrastructure Objects can be "dependent of" Services or other Infrastructure Objects. A "dependent of" relationship implies that the the Service(s) or other Infrastructure Object(s) related to your chosen Infrastructure Object rely on it to operate.
- "belongs to"
- Infrastructure Objects can belong to a System. A "belongs to" relationship implies that your chosen Infrastructure Object is part of a System that forms a single unit.
Establishing relationships between Infrastructure objects and Services/Other Infrastructure objects
Using GraphQL, you can establish that a given Infrastructure Object can depend on or be the dependent of either another Infrastructure Object(s) and/or Service(s). See the following example in GraphQL:
mutation relationshipCreate($source: IdentifierInput!, $target: IdentifierInput!, $type: RelationshipTypeEnum!) {
relationshipCreate(relationshipDefinition: {
source: $source,
target: $target,
type: $type
}) {
relationship {
id
type
source {
... on Service {
id
name
__typename
}
... on System {
id
name
__typename
}
... on InfrastructureResource {
id
name
__typename
}
}
target {
... on Service {
id
name
__typename
}
... on System {
id
name
__typename
}
... on Domain {
id
name
__typename
}
... on InfrastructureResource {
id
name
__typename
}
}
}
errors {
message
path
}
}
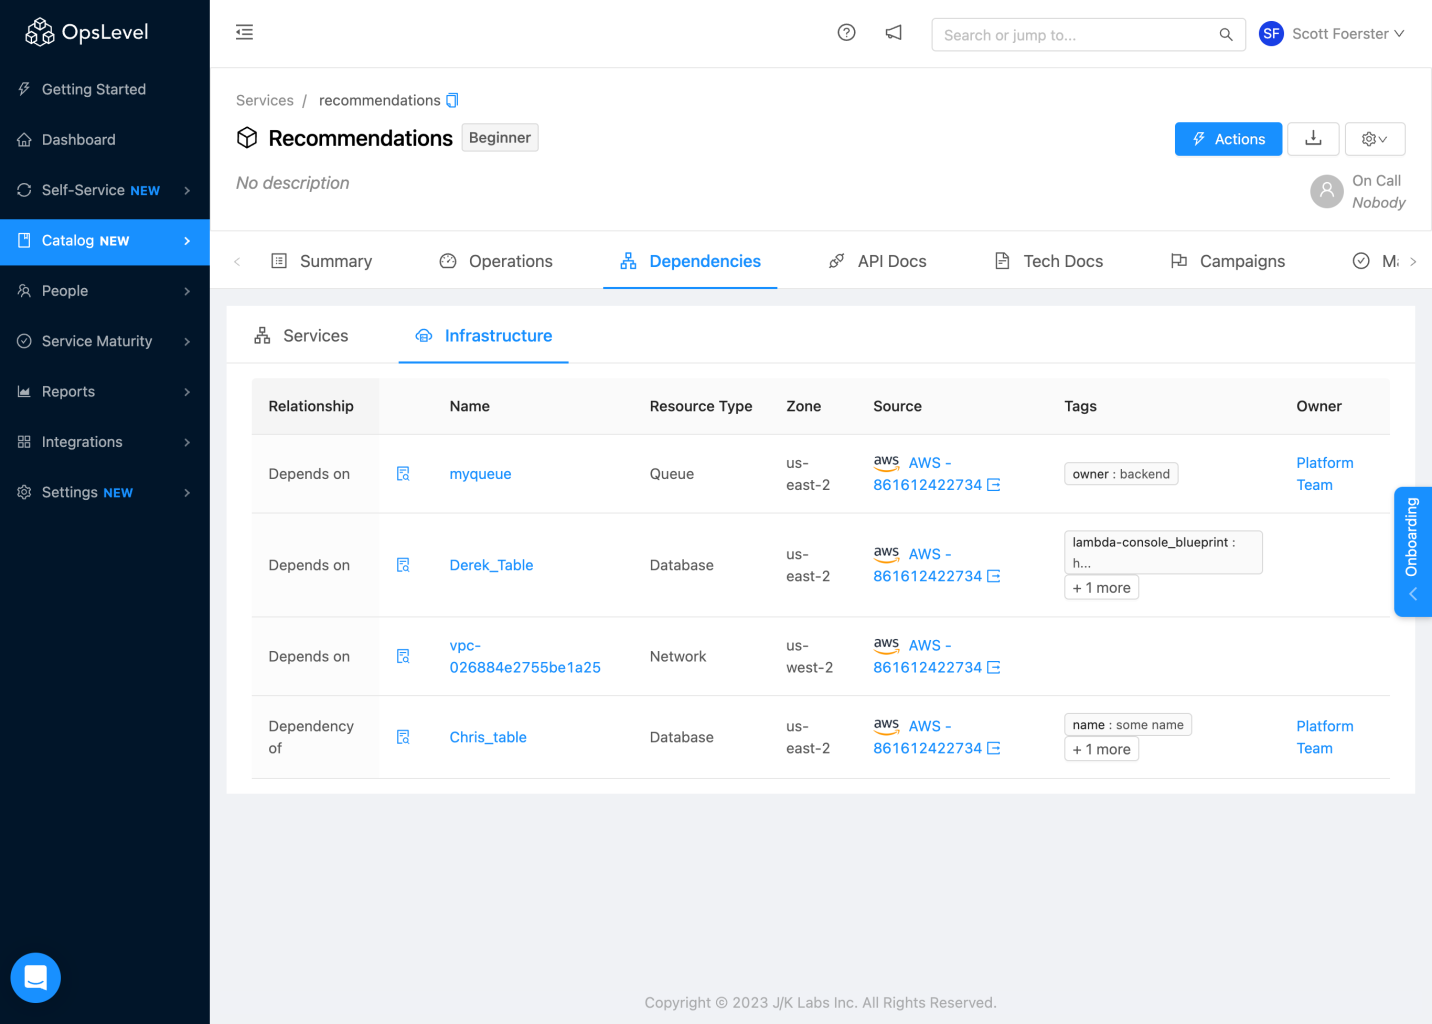
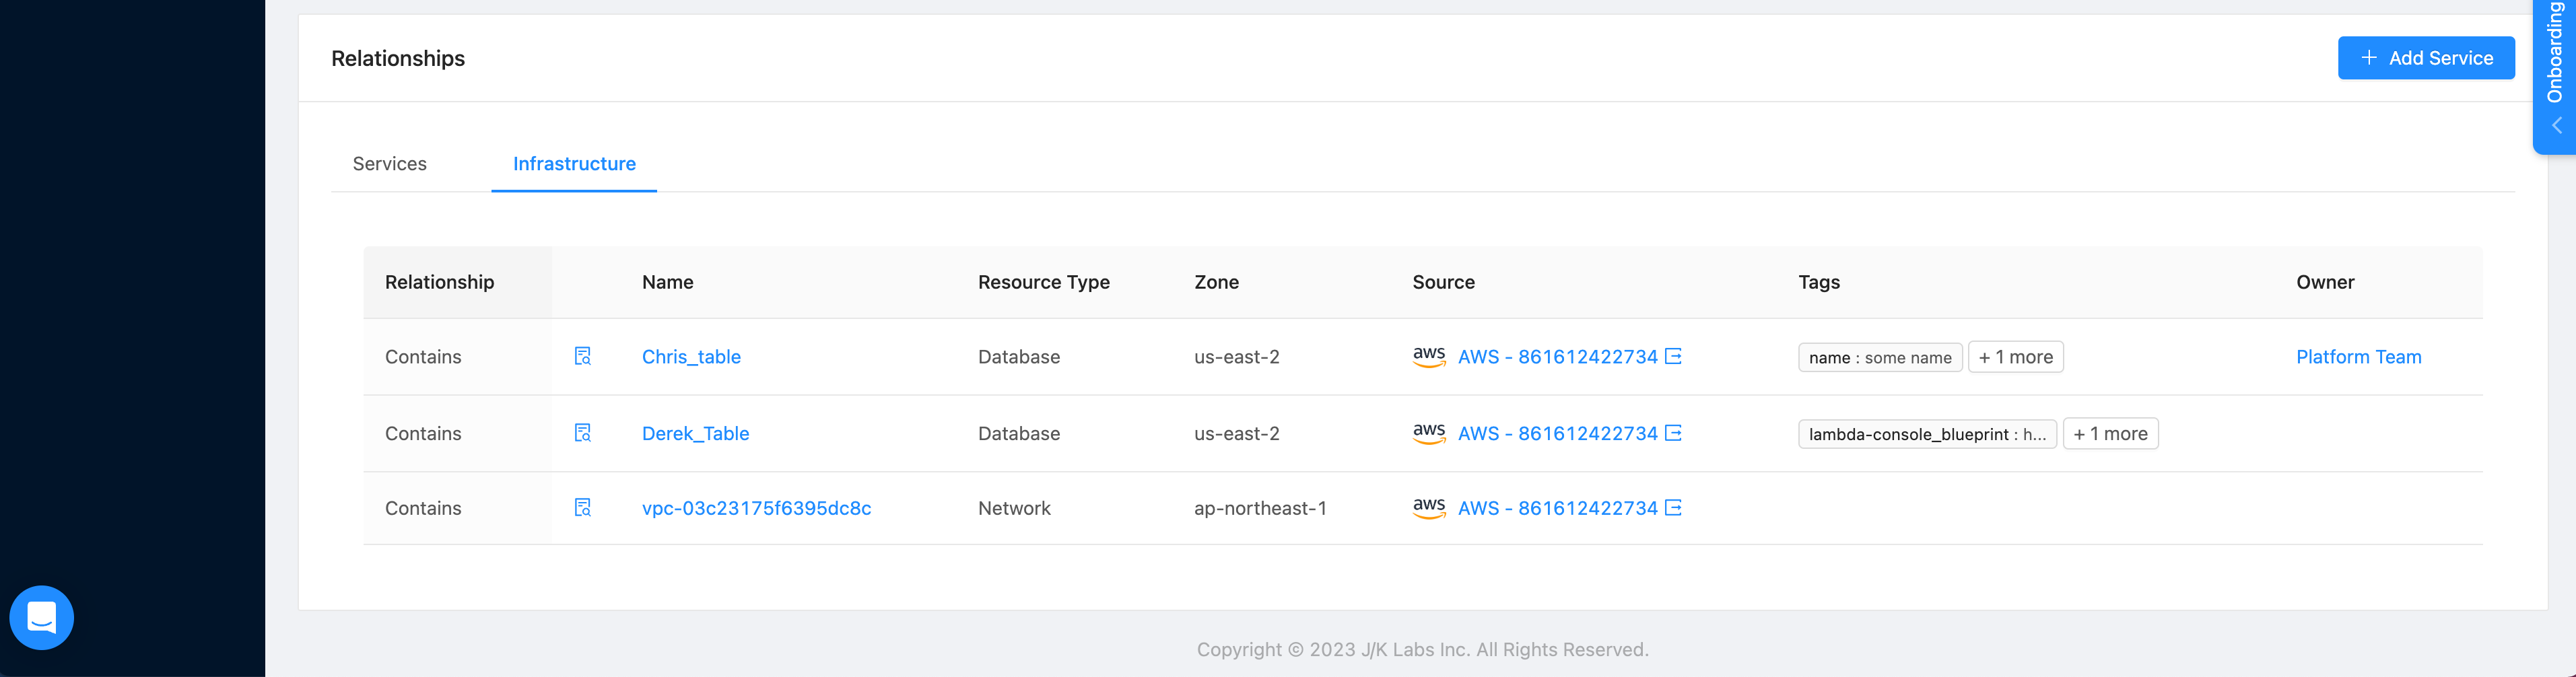
}Once you have set the relationship for your Infrastructure Object, you can see it in two places. The first is within the "Relationship" table in the Infrastructure Details page.
Relationship table in Infrastructure Details page
The second can be found by navigating to the Services show page and clicking on the Infrastructure tab under Dependencies
Infrastructure Dependency table
Establishing relationships between Infrastructure objects and Systems
Using GraphQL, you can establish which System a given Infrastructure Object belongs to. See the following example in GraphQL:
mutation relationshipCreate($source: IdentifierInput!, $target: IdentifierInput!, $type: RelationshipTypeEnum!) {
        relationshipCreate(relationshipDefinition: {
          source: $source,
          target: $target,
          type: $type
        }) {
          relationship {
            id
            type
            source {
              ... on Service {
                id
                name
                 __typename
              }
              ... on System {
                id
                name
                 __typename
              }
              ... on InfrastructureResource {
                id
                name
                __typename
              }
            }
            target {
              ... on Service {
                id
                name
                 __typename
              }
              ... on System {
                id
                name
                 __typename
              }
              ... on Domain {
                id
                name
                 __typename
              }
              ... on InfrastructureResource {
                id
                name
                 __typename
              }
            }
          }
          errors {
            message
            path
          }
        }
      }
Once you have set the relationship between your Infrastructure Object and System, you will be able to see that your Infrastructure Object now belongs to the System by navigating to the Systems Display page and clicking on the Infrastructure tab under Relationships
Systems Display Relationship table
Establishing relationships for Infrastructure Objects via AWS tags
Customers can utilize tags within the admin console to assign relationships to Infrastructure Objects. Our AWS Integration allows you to leverage these tags to make relationship assignment for Infrastructure Objects simple. We allow customers to set three different tags:
opslevel-depends-onopslevel-dependency-ofopslevel-belongs-to
For opslevel-depends-on and opslevel-dependency-of, if the value matches a Service or Infrastructure Object alias, we will automatically assign that relationship. We automatically generate an alias for AWS Objects that is their ARN so that they can be easily used for the tags. We will also lock the ability to adjust these relationships from the API.
Note: Only one value can be assigned per key. If you wish to assign multiple relationships you can add multiple of the same key with unique suffixes appended in the format of opslevel-depends-on* or opslevel-dependency-of* (e.g. opslevel-depends-on1:shopping_cart, opslevel-depends-on2:catalog_service). Keep in mind that AWS has a 50 tag per object limit.
For opslevel-belongs-to, if the value matches a System alias, we will automatically assign that relationship.
Note: Infrastructure Objects can only belong to a single System. As such you are restricted from utilizing multiple opslevel-belongs-to tags. These tags will also take precedent over relationships defined via the API.
Using the OpsLevel CLI to manage your AWS integration
In addition to the GraphQL API, you can also manage your AWS Integration with the following options:
Example: Create a new AWS integration via CLI
cat << EOF | opslevel create integration -f -
kind: aws
spec:
  name: "Prod"
  iamRole: "arn:aws:iam::XXXXX:role/opslevel-integration"
  externalId: "XXXXXX"
  ownershipTagOverrides: true
  ownershipTagKeys: ["owner","service","app"]
EOF
Example: Create a new AWS integration via Terraform
resource "opslevel_integration_aws" "dev" {
  name = "dev"
  iam_role = aws_iam_role.opslevel.arn
  external_id = random_string.external_id.result
  ownership_tag_overrides = true
  ownership_tag_keys = ["owner","team","unit"]
}
Example: Infer Ownership through AWS tags via CLI
cat << EOF | opslevel update integration XXXXXXXX -f -
kind: aws
spec:
  ownershipTagOverrides: true
  ownershipTagKeys: ["owner","service","app"]
EOF
FAQs
Why does the GraphQL API reference infrastructure as Service objects instead of InfrastructureResource objects?
Infrastructure is now components, not InfrastructureResources. In GraphQL API, we reference components as "service" objects.
Updated 9 days ago